The abbreviation KVM stands for "Keyboard, Video (monitor), Mouse." A KVM switch's primary purpose is to enable the management of many PCs or servers using a single keyboard, monitor, and mouse, often known as the "console."
A KVM switch is a hardware device that links one set of keyboard, monitor, and mouse to two or more PCs. It typically looks like a box. The switch is connected to the PCs, and the keyboard, monitor, and mouse are connected to the switch as well.
A user can utilize an on-screen display application, a hotkey on their keyboard, a button on the KVM switch, or a mouse wheel click to switch between the various computers or servers.
Using the same keyboard, mouse, and monitor setup, switching between computers is meant to be quick and simple regardless of the method that is used. KVMs use hardware and firmware to guarantee seamless switching and immediate keyboard, display, and mouse compatibility with each machine.
The Best KVM Switch involves all the facilities you need in a KVM Switch, which will be shared below. In this guide, we will explain the Single Rail 19" 8 Port USB VGA LCD KVM Console.
Best KVM Switch
With KVM, you can create and manage multiple VMs, each running its own operating system on a single physical Switch. It provides a high level of performance by allowing each VM to directly access the underlying hardware, resulting in near-native performance for most workloads. Our TRV819 is the best KVM Switch in the market.
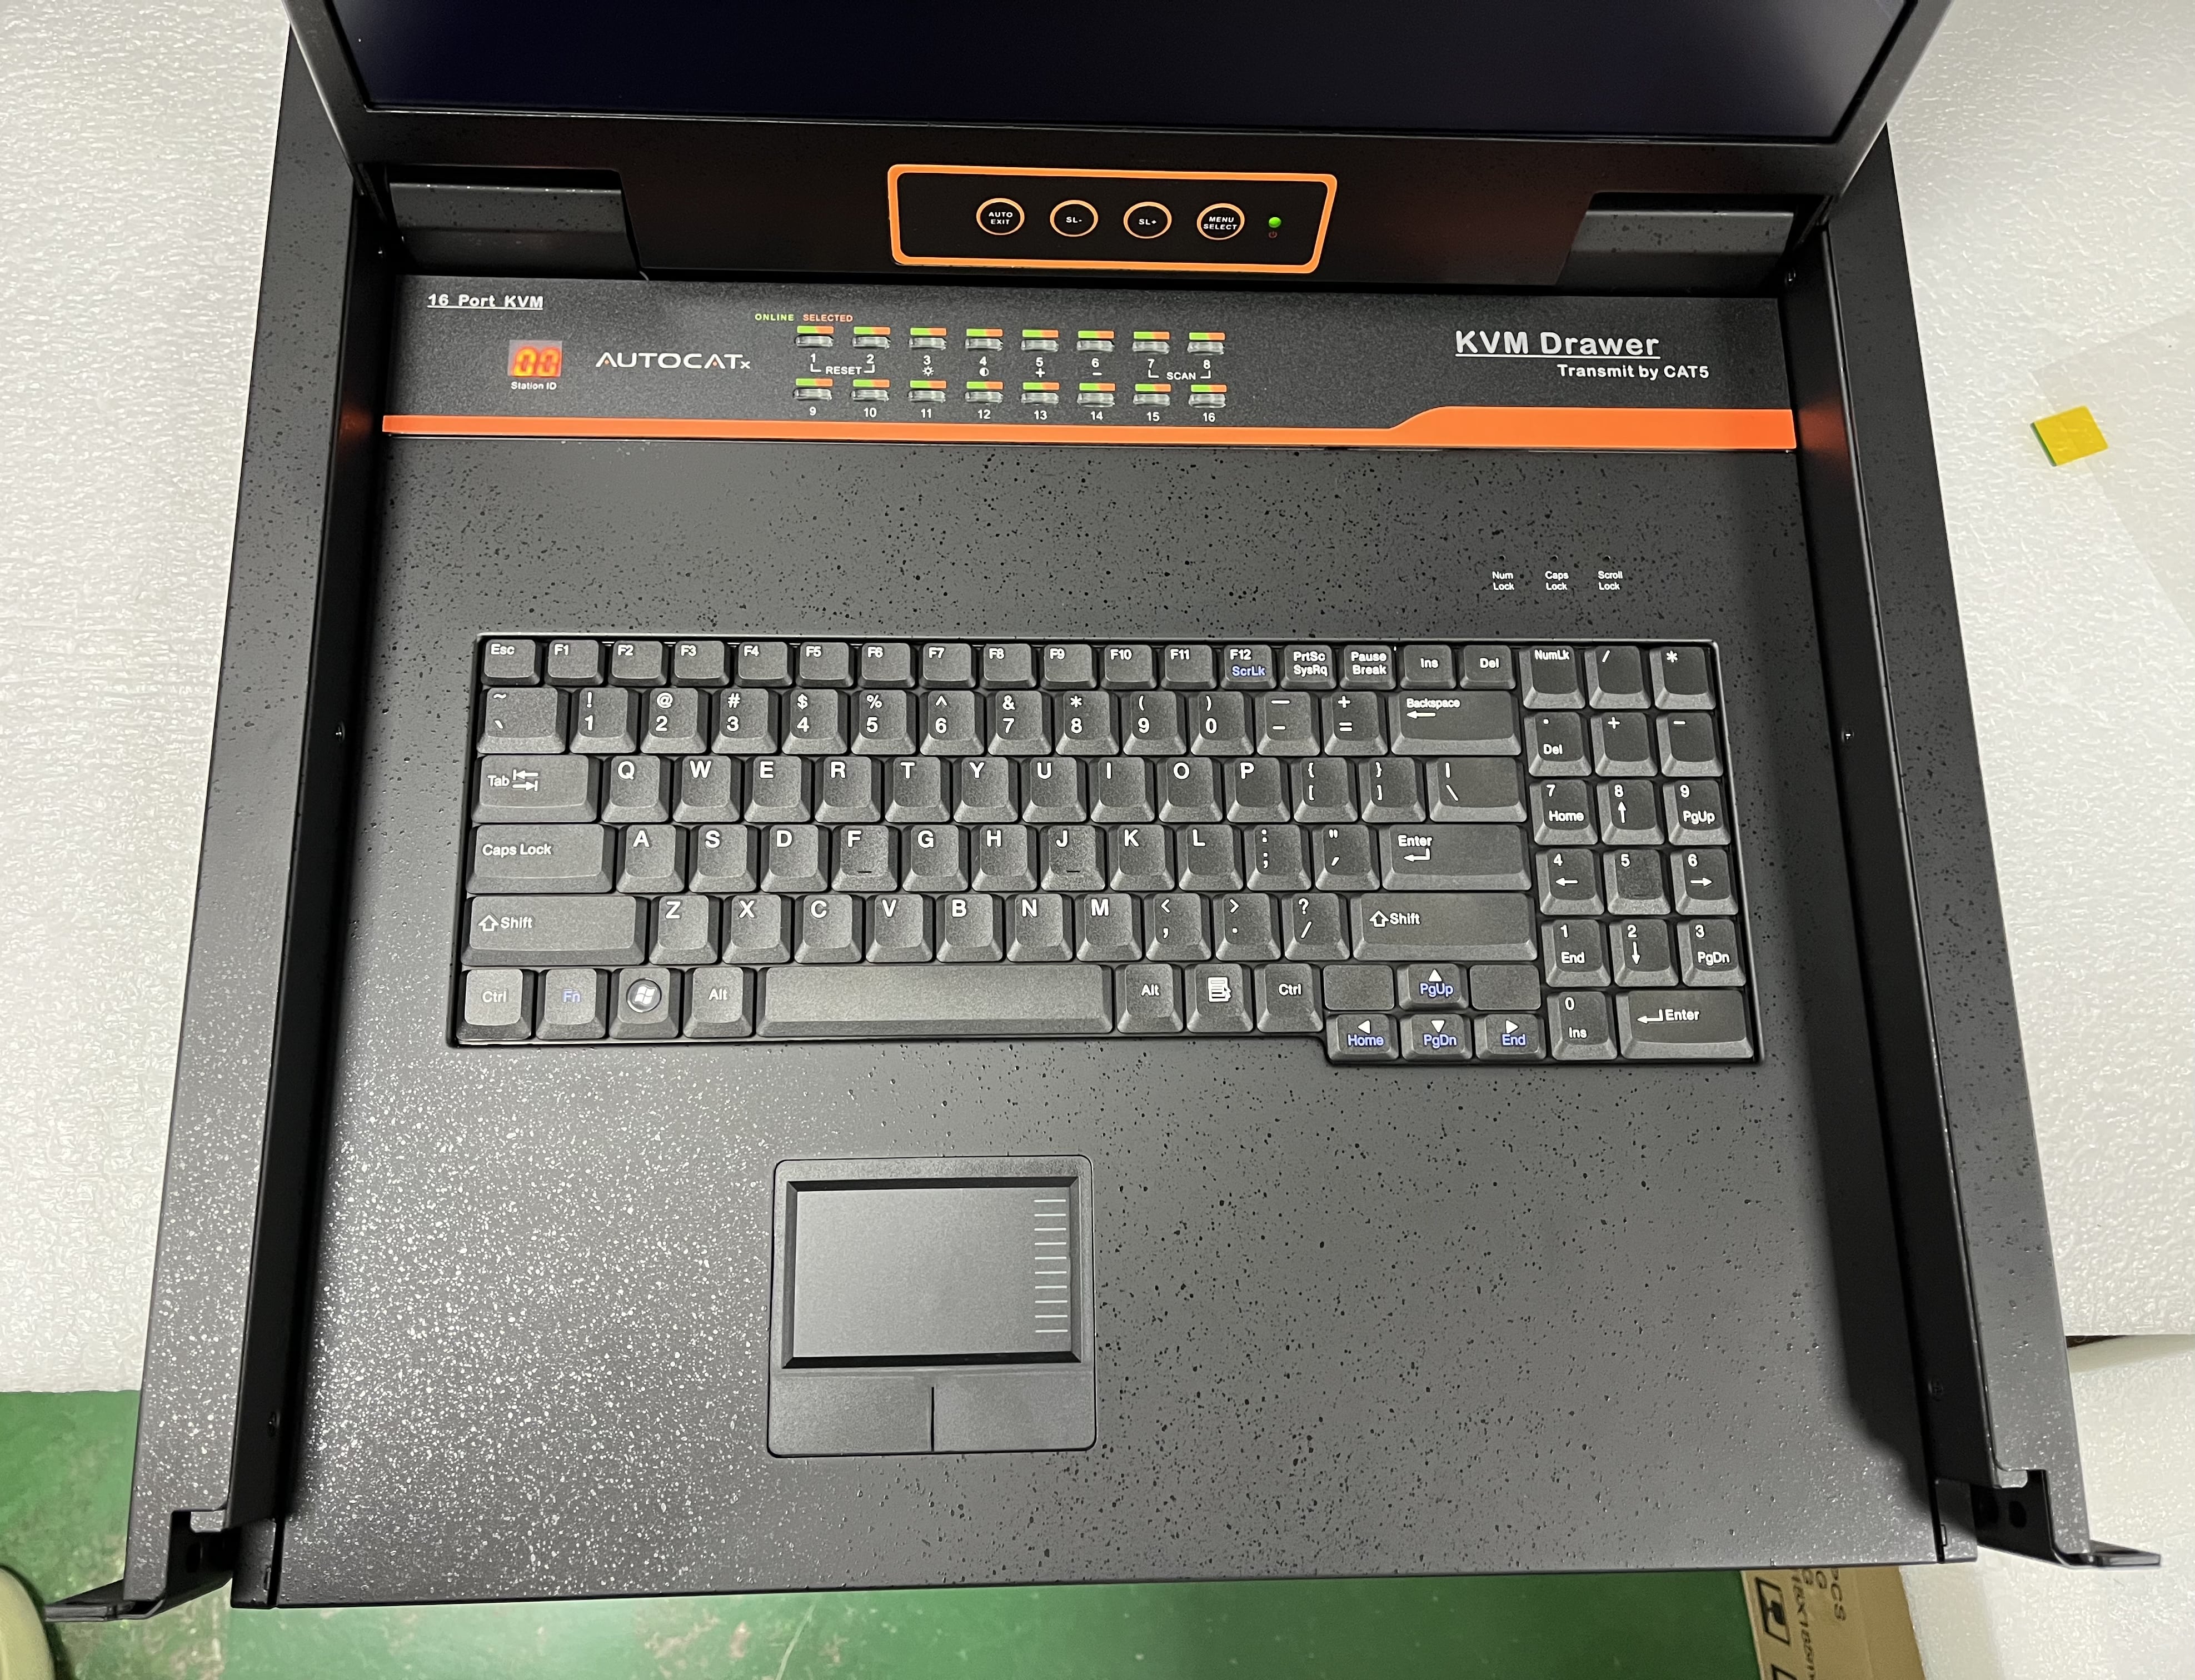
The TRV819 LCD KVM Switch is a single console that takes up under 1U of rack space and integrates a 19" LCD panel, keyboard, and touchpad. Up to 8 PCs can be accessed and managed using a single keyboard, mouse, and monitor console. By daisy-chaining up to 31 XM0108 KVM Switches, the maximum number of linked PCs can be extended to 256.
The built-in LCD monitor of the TRV819 KVM Console can support resolutions of up to 1280x1024@60Hz. Using the front panel pushbuttons, keyboard hotkeys, or on-screen display (OSD) will ease switching between PCs. The LCD KVM switch allows for PC USB connections. An extra VGA monitor can be attached via an additional HDB15 connection. The overall advantage of the Best KVM switch is what every user requires. So, TRV819 LCD KVM switch has great demand in the market.
Features
The best KVM switches have different controlling and operational features that everyone must understand before using. Here are the standard features of the TRV819 LCD KVM Switch.
a)Hardware Features
•TRV819 is known s the best KVM switch because of its Integrated KVM Console with a 19" LCD monitor
•The keyboard/touchpad, along with the eight-port KVM switch and that too in 1U height console, will make it easy to use in a stacked environment。
•A Standard VGA connection that is made possible by connecting to a server or computer via standard VGA connectors will enhance the performance of the best KVM Switches.
•For people with viewing issues, TRV819 has a dedicated LCD module that can be opened up to 108 degrees to provide a comfortable viewing angle.
•The Best KVM Switch, TRV819, supports an external USB & PS/2 keyboard. Although it takes up some space on the outer surface, it is beneficial.
b)Management Features
The TRV819 gives convenient computer switching because it has front panel LEDs, a keyboard hotkey combination, or an on-screen display (OSD).
This will allow the user to switch to any computer without making things complex. Furthermore, the Auto scan feature is available in this best KVM Switch, which monitors the user-selected computer. Moreover, the Broadcast mode will allow operations to perform simultaneously on all selected computers, reducing human effort.
The good thing is that it has a Hot pluggable feature, which allows users to add or remove computers even when it is on. You don't have to remove the switch or power down the computer. There is no difficulty in selecting your computer because the Best KVM Switch will only require Server Name and its SN Number. The standard management features allow TRV819 users to adjust the screen image, auto adjust, power on/off, exit, menu, and brightness.
c)High Resolution
The Best KVM Switches require a high resolution for monitoring different computers simultaneously. For example, TRV819 KVM Switch has a 19'' TFT LCD KVM monitor with a highlight, high definition, and High Resolution. The Resolution will offer up to 1280 x 1024 @60Hz, which is more than enough in this range.
d)Daisy-Chain Connection
The best KVM Switches require this feature. TRV819 will offer control of up to 256 users. The users can use Daisy Chain 31 switches to achieve this feat. This KVM Switch uses different switches like XM0108XU0108, XM0116, and XU0116.
e)Security
The security setup of TRV819 made it the best KVM Switch. It has two-level password security, allowing only authorized users to view and control computers. The one administrator account will permit only one person to have complete control; however, it also offers four user accounts with separate profiles to reduce the administrator's burden.
f)Scrolling Touchpad
The high-performance touchpad of TRV819 has a scroll wheel that enables an easy-to-use interface. The users will not require any external mouse or separate controlling equipment.
g)Large Keyboard
The best KVM Switch requires a large keyboard to control the other connected PCs efficiently. TRV819 has a full-size 99 keys keyboard that also offers integrated number pads for its users. In addition, TRV819 supports different languages for people of various nationalities to use and understand. Some common languages are English, German, Russian, French, Korean, Spanish, etc.
h)Wide Compatibility
The broad compatibility of TRV819 makes it the best KVM Switch in the market. It offers compatibility with Mac, Linux, Windows, and Sun. This KVM Switch well supports the servers of different PC companies. The TRV819 supports other servers, such as Huawei, Lenovo, IBM, HP, Dell, and Cisco, to name a few.
Specifications
The TRV819 has many specifications, showing why it is known as the best KVM Switch.
•It offers eight direct connections and 256 maximum connections, which is excellent for its use in commercial as well as business stages
•TRV819 has a USB port to connect Mouse and Keyboards
•The LCD model of SXGA TFT allows a viewing screen of 19 inches, with a display color of 16.7 M, and an optimum resolution of 1280×1024@60Hz which is picture perfect scale to monitor different PCs
•The LCD monitor has 250cd/m² (T y p) brightness, a contrast ratio of 1000: 1 (T y p), and a pixel pitch of 0.2928(H) × 0.2928(W) mm
•The mouse has a scroll wheel touchpad that supports the scroll wheel function and gives an x/y resolution of >1000 points /inch (40 points/mm)
•The best KVM Switch allows 100V- 240Vac, 50-60Hz, <1.5A which allows it to use anywhere
•The power consumption of this KVM Switch is 21W, and the operating temperature is 0-50 centigrade which allows you to use it in any winter or summer conditions
•The store temperature gives a great range because it is -20-60 centigrade
•The humidity is noncondensing and can have a percentage of 0-80 percent
•A weight of 13.3 kilograms is not much because a single person can move the TRV819 KVM Switch here and there with ease
•The product dimensions are short, making it easy to place in a room. The product dimensions are 448mm×605mm×42.5mm (WxDxH)
How to Install KVM
To install a KVM (Keyboard, Video, Mouse) switch, you'll need to follow these general steps:
•First of all you need to make sure to ground the control platform
•Make sure you have the appropriate KVM switch that matches your setup requirements (number of computers, ports, etc.)
•You will need VGA, DVI, HDMI, or DisplayPort cables for video connections, USB cables for keyboard and mouse connections, and audio cables if required.
•Ensure you have a keyboard, mouse, and monitor available for each computer you plan to connect to the KVM switch.
•Choose a suitable location for the KVM switch that allows easy access to the connected computers and provides sufficient ventilation
•Before connecting the KVM switch, make sure all the computers are powered off
•Connect the video cables from the computers to the appropriate video ports on the KVM switch. Match the video connector types (VGA, DVI, HDMI, DisplayPort) to the corresponding ports on the switch
•Connect the keyboard and mouse cables from each computer to the corresponding keyboard and mouse ports on the KVM switch. The male end of the power cord should go in the 220V AC power socket, and the female end should go in the KVM power socket.
•If your KVM switch supports audio, connect the audio cables from the computers to the audio ports on the switch.
•Connect the monitor cables from the KVM switch to the monitors
•Connect the power adapter to the KVM switch and plug it into a power outlet
•Turn on the computers that are connected to the KVM switch. When the power is turned on, the KVM will make two "whoosh" noises
•Most KVM switches allow you to switch between computers using keyboard hotkeys or buttons on the switch itself. Refer to the manufacturer's documentation for the specific instructions on how to switch between computers
•Ensure that you can successfully switch between the connected computers and that the keyboard, mouse, and video signals are working correctly
•Flip open the display panel after releasing the latch and completely removing the KVM control end from the cabinet.
•Press "Enter" twice to continue when the "Enter Name and Password" window appears on the monitor after the KVM has been turned on.
•The server or PC can now be powered on. The appropriate port key connected's indicator light is green.
•When you press the front panel button for the port you want to use, the matching port key's indicator light becomes orange and you can start using that host.
Managing KVM Switches
Once you have created KVM Switches, you must manage them effectively. Here are some key management tasks:
Starting and stopping VMs: You can start, stop, pause, or restart virtual Switches using management tools like "virsh," "virt-manager," or web-based interfaces.
Resource allocation: Adjust the CPU, memory, disk, and network resources allocated to each virtual Switch based on your requirements. You can do this dynamically while the VM is running or configure it in the VM's settings.
Live migration: KVM supports live migration, allowing you to move a running VM from one host to another without service interruption. This is useful for load balancing, maintenance, or failover scenarios.
Monitoring and troubleshooting: Monitor virtual Switches' performance and resource usage using tools like "liberty" or third-party monitoring solutions. Check logs and diagnose problems using standard troubleshooting techniques in case of issues.
Security Considerations
When using KVM, consider the following security aspects:
*Regularly update and patch the host system to ensure it is secure.
*Isolate virtual Switches by configuring appropriate network settings and access controls.
*Keep guest operating systems up to date with security patches and proper configurations.
*Implement security measures, such as firewalls, intrusion
Pros and Cons
TRV819 has many advantages and a few disadvantages.
Advantages
*TRV819 is a mature, established system that is open source and free of charge
*The best KVM Switch is the only genuine KVM Switch that ensures performance and stability at the same time
*Techraki is a reputable company that provides a guarantee of its Switch's performance and
Disadvantages
*The learning process of TRV819 is time-consuming and difficult
*The chance of a system failure grows with centralization of the hardware (i.e., a single point of failure), although this risk can be decreased with a clever backup plan.
Conclusion
TRV819 is widely used in various environments, from small-scale deployments to large data centers, due to its performance, flexibility, and cost-effectiveness. So, it is the best KVM Switch available in the market.